Have you noticed a gradual decrease in speed of your computer since you first purchased it? You’re not alone. It’s near impossible to avoid the inevitable slowdown of a computer over time.
Here are some things that cause your computer to slow to a crawl:
- The addition of new programs that consume more hard drive space and memory (especially bloated software included with new printers/scanners and Internet security software)
- The fragmentation of files on your hard drive as programs are installed and removed or files are created and deleted
- Inadvertent installation of poorly designed malware
With this in mind, let’s go over some steps you can take to bring some life back into your computer. In this article, I’ll focus more specifically on Windows XP, however many of these steps can be applied to Windows Vista as well.
Contents
SCAN FOR MALWARE:
Malware – an all encompassing term for things like viruses, spyware, adware, and trojan horses – can cause your computer to act sluggish. Not only that, but it can also sit quietly in the background collecting your personal information such as credit card numbers and banking information. It’s a good idea to scan your computer once in a while for malicious software.
You should have an anti-virus program installed that routinely scans for malware. I typically recommend AVG Free edition which can be downloaded from here. You can configure AVG to scan your entire computer on a regular schedule. I normally configure AVG to scan once weekly, early in the morning, so that it does not interfere with you while you work during the day. To see a list of free anti-virus programs check out this article.
Anyways, viruses can still infect your computer even if you are running an antivirus program. Typically they come through email, malicious web sites, or popups that trick you into installing software. So we still need to scan for malware even if you are running antivirus. Download and install Malwarebytes, update it, and run a quick scan. Remove any malware that it finds.
INSTALL MORE MEMORY (A.K.A. RAM)
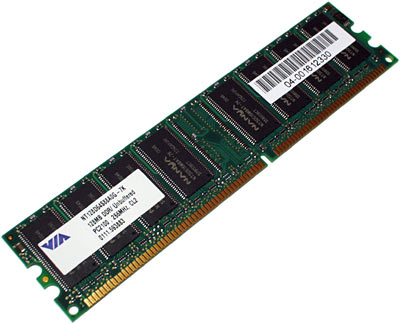
Let me first define the difference between storage (hard drive) and memory (RAM). Storage is where all of your programs and files are stored when your computer is turned off. When the computer is turned on, the programs are copied from storage (the hard drive) into memory (chips of RAM). It’s much faster for the computer to retrieve data from memory than it is from storage. If the computer doesn’t have enough memory, then it must read from storage (the hard drive) causing slowness.
These days memory is so cheap that you might as well have at least 1GB (1024MB) of RAM in your Windows XP machine and 2GB (2048MB) RAM in your Windows Vista machine. If you are running Windows XP with 256MB of RAM or less, you will certainly notice a significant boost in speed after you upgrade to 1GB.
You may need more memory than the above recommended amounts depending on the type of applications you use. For instance, if you like to edit photos, videos, or play 3D games, you may need additional RAM. Also, certain security suites (like Norton and McAfee) take up quite a bit of memory. Consider installing one which uses less memory. To see a list of security suites and the amount of memory they require, check out this link.
To see how much memory you have in Windows XP:
1. Right-click on “My Computer” and select “Properties” from the menu.
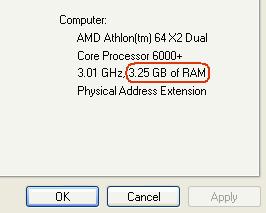
You will see your hardware specs at the bottom of the window:
*** Note: You may notice that Windows reports you have slightly less memory than 256MB, 512MB or 1GB. Perhaps your computer case says you have 512MB but Windows XP reports you only have 486MB. The reason for that is some of the memory has been set aside for your integrated video card.
To check how much memory you have in Windows Vista,
1. Click the start button
2. Right-click “Computer”, and select “Properties”:
If you have less than 1GB in XP or less than 2GB in Vista, you may want to consider upgrading. Memory installation is fairly simple. There are many tutorials on the Internet that show you how to do it. You can purchase memory from an electronics store such as Future Shop or Staples or you can order online from Tigerdirect.
For a detailed tutorial on how to install RAM, see this web page.
OPTIMIZE YOUR “VIRTUAL MEMORY”:
Virtual memory is used when Windows runs out of real memory (RAM) to assign to programs. Too little virtual memory can slow down your computer. It’s best to manually set the size of your page file to 1.5X the amount of real memory so that Windows doesn’t have to waste resources re-adjusting it.
To manually set the size of the paging file (virtual memory), follow these steps:
1. Right-click on “My Computer” and select “Properties”
2. Click the “Advanced” tab and then click the “Settings” button under the “Performance” section
3. Click the “Advanced” tab in the “Performance Options” window that pops up
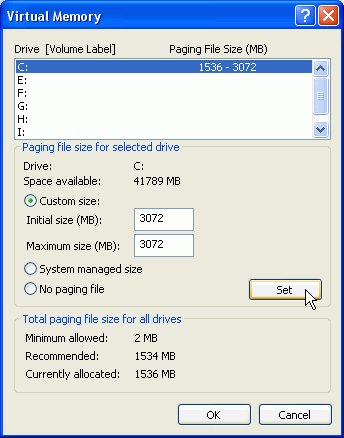
4. Click the “Change” button under the “Virtual Memory” section. A “Virtual Memory” window should appear (see image below)
5. Make sure that “Custom size” is selected. The paging file should be 1.5X the amount of memory you have in your computer.
6. Click “OK” and you will be informed by Windows that you should reboot your computer
7. Reboot the computer
TIP: Ideally, your virtual memory file should be located on a hard drive partition other than your system partition. This way, the page file will not be fragmented and Windows can access it more effeciently. When I install Windows XP I use the setup program to create a small (say 5GB) partition to be used soley for virtual memory.
FREE HARD DRIVE SPACE
You should also check to make sure that your hard drive has enough free space. If your hard drive is too full, Windows will have difficulty managing the virtual memory. To check the amount of free space on your hard drive, follow these steps:
1. Open “My Computer”
2. Right-click on “Local Disk C:” (the hard drive) and select “Properties”
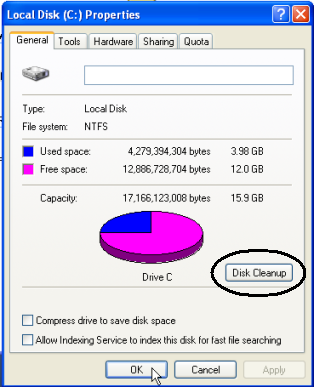
A pie chart will appear indicating how much free space is available on the disk. If there is less than 10% free space on your hard drive, consider offloading large files (like movies, music, and pictures) to an external drive. Also, review the list of installed applications (from the control panel double-click Add/Remove programs) and remove any that you no longer use. You can also download the free program ATF Cleaner to delete temporary files.
DISABLE UNECESSARY STARTUP PROGRAMS
Many programs run automatically when you start your computer. You can get a general idea of how many of these background programs are running by looking at the system tray at the bottom right corner of your screen. In Windows Vista, you may have to click an arrow to get the full list:
Many important items reside down here like anti-virus and firewall software, but many unnecessary programs are found here too. Anything open in the system tray is using up system resources such as memory and processor cycles and therefore slowing down your computer. By removing the unneeded ones, you can speed up your computer. To view a list of these start-up programs, open the msconfig dialog box:
1. Click the start button and select “Run…”
2. Type “msconfig” into the white box, and press enter.
***Note: In Vista, just click the start button, type “msconfig”, and press enter
3. In the “System Configuration Utility” dialog box, click the “Startup” tab:
Here you will see a list of all of the programs that start automatically when Windows loads (Well, not quite ALL of them. Advanced users may want to use AutoRuns to get the full scoop on what’s starting automatically).
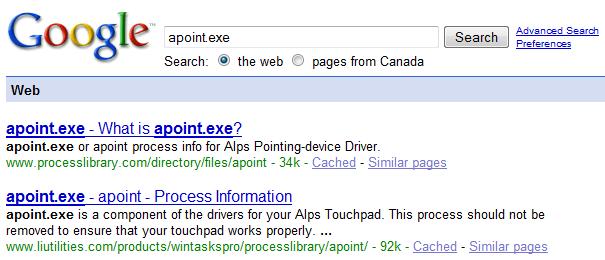
So what does each program do and which ones can we safely disable? After some experience, you become familiar with common ones. However, in the beginning you’ll have to do some research. Expand the “Command” column so that you can see the path to and name of the executable file that is loading. Now go to Google and type in the file name there. For example, I did a search for “apoint.exe” and Google returned these results:
After some research, I determined that apoint.exe is a program needed to run the touch pad on my laptop. Since I want it to continue functioning, I will not disable this item. However, according to several web sites, reader_sl.exe is an unneeded program that can safely be disabled, so I remove the check mark beside it, click “Apply” and then “Okay” to save my changes. Windows tells me that the computer must restart for the changes to take effect. Say “no” to that and continue researching and disabling the rest of the unnecessary items. Once finished, restart the computer. Everything you unchecked will no longer start automatically. Hopefully you will notice a speed improvement after doing this.
Not only does this procedure save resources on your PC but it’s also interesting to learn what background processes are running on your computer. For more information on msconfig check out this Wikipedia article.
DISABLE UNECCESARY WINDOWS SERVICES
You can also free up system resources by disabling unnecessary Windows services. There are dozens of Windows services that start automatically when your computer loads – some of which you need, and some you don’t. To view these services, right-click on “My Computer” and select “Manage” – a Computer Management window will appear. Click the plus sign beside “Services and Applications” and select “Services”. A list will appear on the right side of the window:
Each service takes up a small portion of system resources. Click here for information about what each service does and recommendations for which ones to disable.
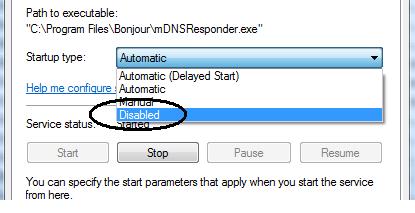
To disable a service, double-click on it, and change the “Startup Type” to disabled.
After you’ve disabled all the unecessary services, restart your computer.
DEFRAG YOUR HARD DRIVE
When you are constantly installing and removing programs, creating and deleting files, all this data gets scattered over your hard drive. Therefore, it takes longer for your computer to retrieve the information because it must jump from one section of your hard drive to another frequently. The defrag process re-arranges all the data on your hard drive so that it is contiguous and much easier for the computer to retrieve.
By default Windows Vista will defrag your computer on a regular basis. However, you must manually defrag in Windows XP, unless you are familiar with Scheduled Tasks. A defrag every few months should be sufficient. To defrag in Windows XP:
1. Open “My Computer”
2. Right-click on “Local Disk C:” and select “Properties”
3. Click the “Tools” tab and click the “Defragment Now” button
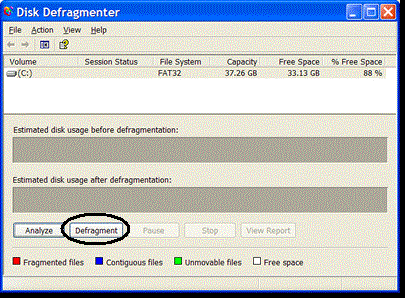
4. Click the “Defragment” button in the Disk Defragmenter window
5. Wait until the process is complete, then reboot your computer
*** Note: If the defragment process constantly restarts itself it could be that some program on your computer keeps writing to the disk. To avoid this, run defrag in safe mode.
COMPLETE SYSTEM RESTORE
Some computers become so badly infected with malware (the kind that’s undetectable or just won’t go away) that the best solution is to completely wipe the computer clean and install a fresh copy of Windows. Before you do that, you’ll want to make sure you backup your important data to an external device.
CONCLUSION
The two most common causes of computer slowness is a lack of memory (RAM) and bulky programs which take up too much memory.
I hope you notice a speed improvement after you’ve followed the steps in this article.
