This is a step-by-step guide for replacing Lollipop 5.1.1 with Cyanogenmod and XPrivacy on a stock Nexus 5.
Do you want to learn more about your phone and control access to your personal data? Those are a couple of reasons to wipe the stock Android operating system and replace it with Cyanogenmod and XPrivacy. Both are transparently developed, open-source software.
The pre-installed Android operating system provides no functionality for restricting specific app permissions. When you install an app from the Playstore, you either grant it all the access it asks for, or cancel the installation.
With XPrivacy you can block applications from accessing sensitive information such as your contact list, text messages or location.
Why use XPrivacy instead of App Ops or Cyanogenmod’s Privacy Guard? Read this article.
If you run into unexpected problems or would like more information, search the forums at Cyanogenmod or XDA-Developers (the group behind the Xposed Framework, XPrivacy and other cool open-source Android projects)
Contents
- 1 Download installation files (TWRP, Cyanogenmod, Gapps, Xposed Framework, Xposed Installer, XPrivacy Installer)
- 2 Install Fastboot and ADB
- 3 Enable Developer Tools and USB Debugging
- 4 Unlock Phone (will delete all data)
- 5 Install Custom Recovery
- 6 Flash Cyanogenmod, Gapps (optional), and Xposed Framework
- 7 Root the Phone
- 8 Install Exposed Installer and XPrivacy
- 9 Disable ROOT
- 10 Additional Resources:
Download installation files (TWRP, Cyanogenmod, Gapps, Xposed Framework, Xposed Installer, XPrivacy Installer)
The download links provided below will probably change over time. Please let me know in the comments section if they aren’t working.
***Note that some of these download links are specifically for Nexus 5 phones.
1. TWRP (Team Win Recovery Project): A custom recovery used for installing custom software on your device. Download the latest version here. Look above the .img file for an md5sum, which you can use to verify the download.
Note: The other popular recovery option is CWM (ClockworkMod). Both are open source and offer similar features.
2. Cyanogenmod: Open source firmware distribution for smart phones based on the Android mobile operating system. Download the latest version (for Nexus 5 / Hammerhead) here. There are no “stable” releases, so choose the latest nightly build. The md5sum is located below the download link.
![]()
3. Gapps (Optional): Due to licensing restrictions, Google Apps (YouTube, Hangouts, Google Play, etc.) cannot be included in Cyanogenmod. They must be installed separately. Download them from The Open GApps Project. I chose to download the pico variant to reduce bloat. It includes only Google Play, which all other Google Apps can be downloaded from. The md5sum can be found at the bottom of the page.
4. Xposed Framework: Gives you the possibility to modify your ROM, and is required to install XPrivacy. This is the back end portion of Xposed. Download the latest version for Android 5.1.1 from XDA Developers. Scroll down to the “Attached files” and look for a file in this format -> xposed-v??-sdk22-*.zip. The latest version, as of this writing, is xposed-v68-sdk22-arm-by-romracer-20150727.zip.
Note: If you don’t have Lollipop 5.1 on a Nexus 5, see which framework to install (Discussion)
5. Xposed Installer: Used to manage installed modules (such as XPrivacy). This is the front end portion of Xposed. Download the latest version from XDA Developers. The latest version as of this blog post is XposedInstaller_3.0_alpha4.apk.
6. XPrivacy: Prevents applications from leaking privacy sensitive data. Download the latest version from Github. The file comes in .apk format.
At this point, you may want to verify the md5sums of the downloads.
Install Fastboot and ADB
Fastboot: Android SDK tool that can be used to re-flash partitions on your device.
ADB: Facilitates communication between an Android device and a personal computer, usually through a USB cable.
To install these tools on a Debian based Linux (e.g. Ubuntu or Mint), open up a terminal window and type the following:
sudo apt-get install android-tools-adb android-tools-fastboot
Windows users can follow this Lifehacker guide.
Enable Developer Tools and USB Debugging
In order to communicate with the phone via a Linux terminal, Developer Tools need to be enabled.
On the phone, go into Settings -> About Phone -> Build number. Tap “Build number” repeatedly until you see the message “You are now a developer!”.
Now go into Settings -> Developer options. Enable USB Debugging.
Connect the phone to your computer with a USB cable.
This page explains how to enable Developer options in more detail.
Unlock Phone (will delete all data)
***WARNING*** WHEN YOU UNLOCK YOUR NEXUS 5, ALL DATA ON THE PHONE WILL BE WIPED (Photos, texts, apps, app data, etc.), so ensure you backup anything important before proceeding.
The phone must be unlocked to allow the installation of a custom recovery and operating system. For security reasons, this will delete all data.
Issue the following command to boot the device into fastboot mode:
adb reboot bootloader
On the phone, you will be prompted to accept the computer’s RSA key. Tap “Ok”.
Note: if you see the message “error: device offline” in the terminal window, try issuing the command again.
The phone should reboot into fastboot mode:
Verify that the computer sees the device with the command:
fastboot devices
The command should display the phone’s serial number followed by “fastboot”. If it doesn’t work, check the Cyanogenmod WIKI.
*ALL DATA ON PHONE WILL BE DELETED ON THE NEXT STEP*
Issue the command:
fastboot oem unlock
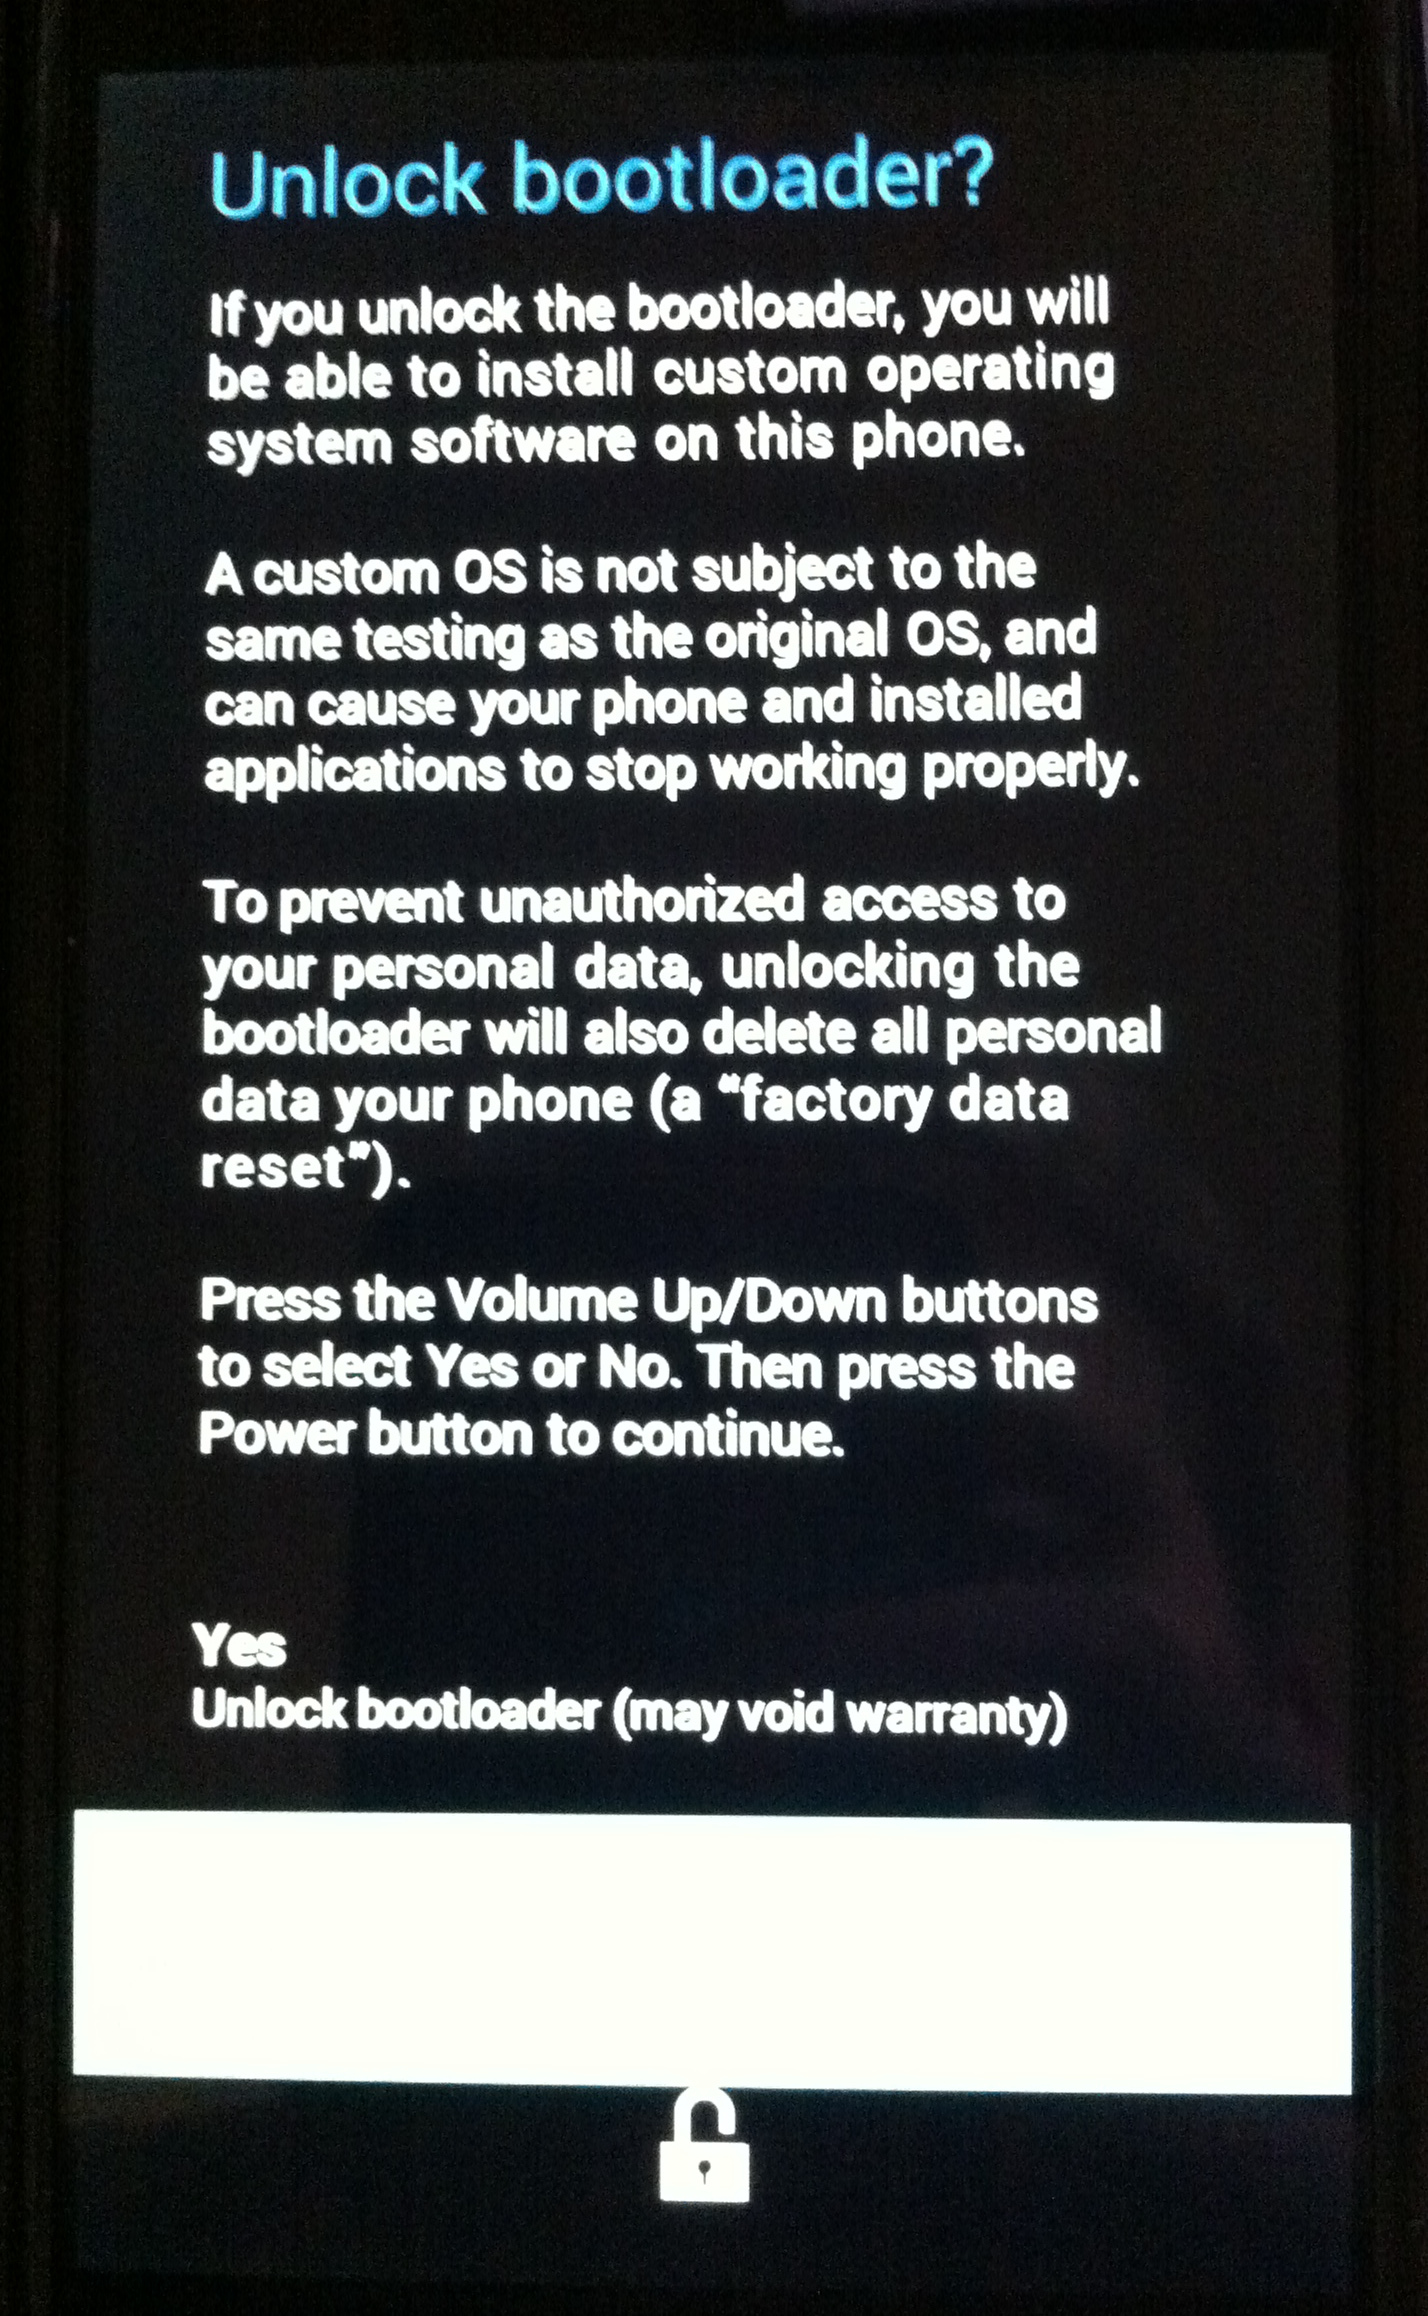
Unlock Disclaimer
Read the disclaimer that appears. To proceed, use the volume buttons on the phone to highlight the “Yes” option. Press the power button to select it.
As the phone’s data is being erased, it will display “Erasing…”. Wait until you see the message “LOCK STATE – unlocked”.
Use the volume buttons to select “start” from the menu and press the power button (See why a reboot is necessary before flashing a custom recovery).
During startup, you should see an unlocked padlock at the bottom of the screen indicating that the phone has been unlocked. The phone will take a lot longer than usual to start.
As we will be flashing the phone with Cyanogenmod, skip through most of the setup. If available, connect to WIFI to ensure the phone does not use cellular data services to install any updates.
More information on how to unlock the bootloader on a Nexus 5.
Install Custom Recovery
After setup completes, the phone will have returned to default settings. You need to re-enable developer options and USB debugging to communicate with the phone via USB (See step three).
*** At this point, copy all the files downloaded in step one to a directory on the device (E.g. The Download directory). The Cyanogenmod, Gapps, and Xposed Framework files should all remain in their .zip format (do not extract).
Issue the command adb reboot bootloader to reboot the phone into fastboot mode.
Verify that the computer can see the device by typing fastboot devices.
Flash the TWRP recovery ROM to the phone by issuing the following command:
fastboot flash recovery TWRP_recovery_file.img
Where TWRP_recovery_file.img is the name of the TWRP img file you downloaded in step one.

Flashing TWRP Recovery
After it has finished, power down the phone by selecting “Power off” from the fastboot menu (use volume buttons and power button to select).
After powering off, hold both the volume down and power button until the phone enters fastboot mode (takes about five seconds). See more specific advice at phoneArena.
Navigate to “Recovery mode” with the volume keys and press the power button to select it. The phone should launch the TWRP recovery program:
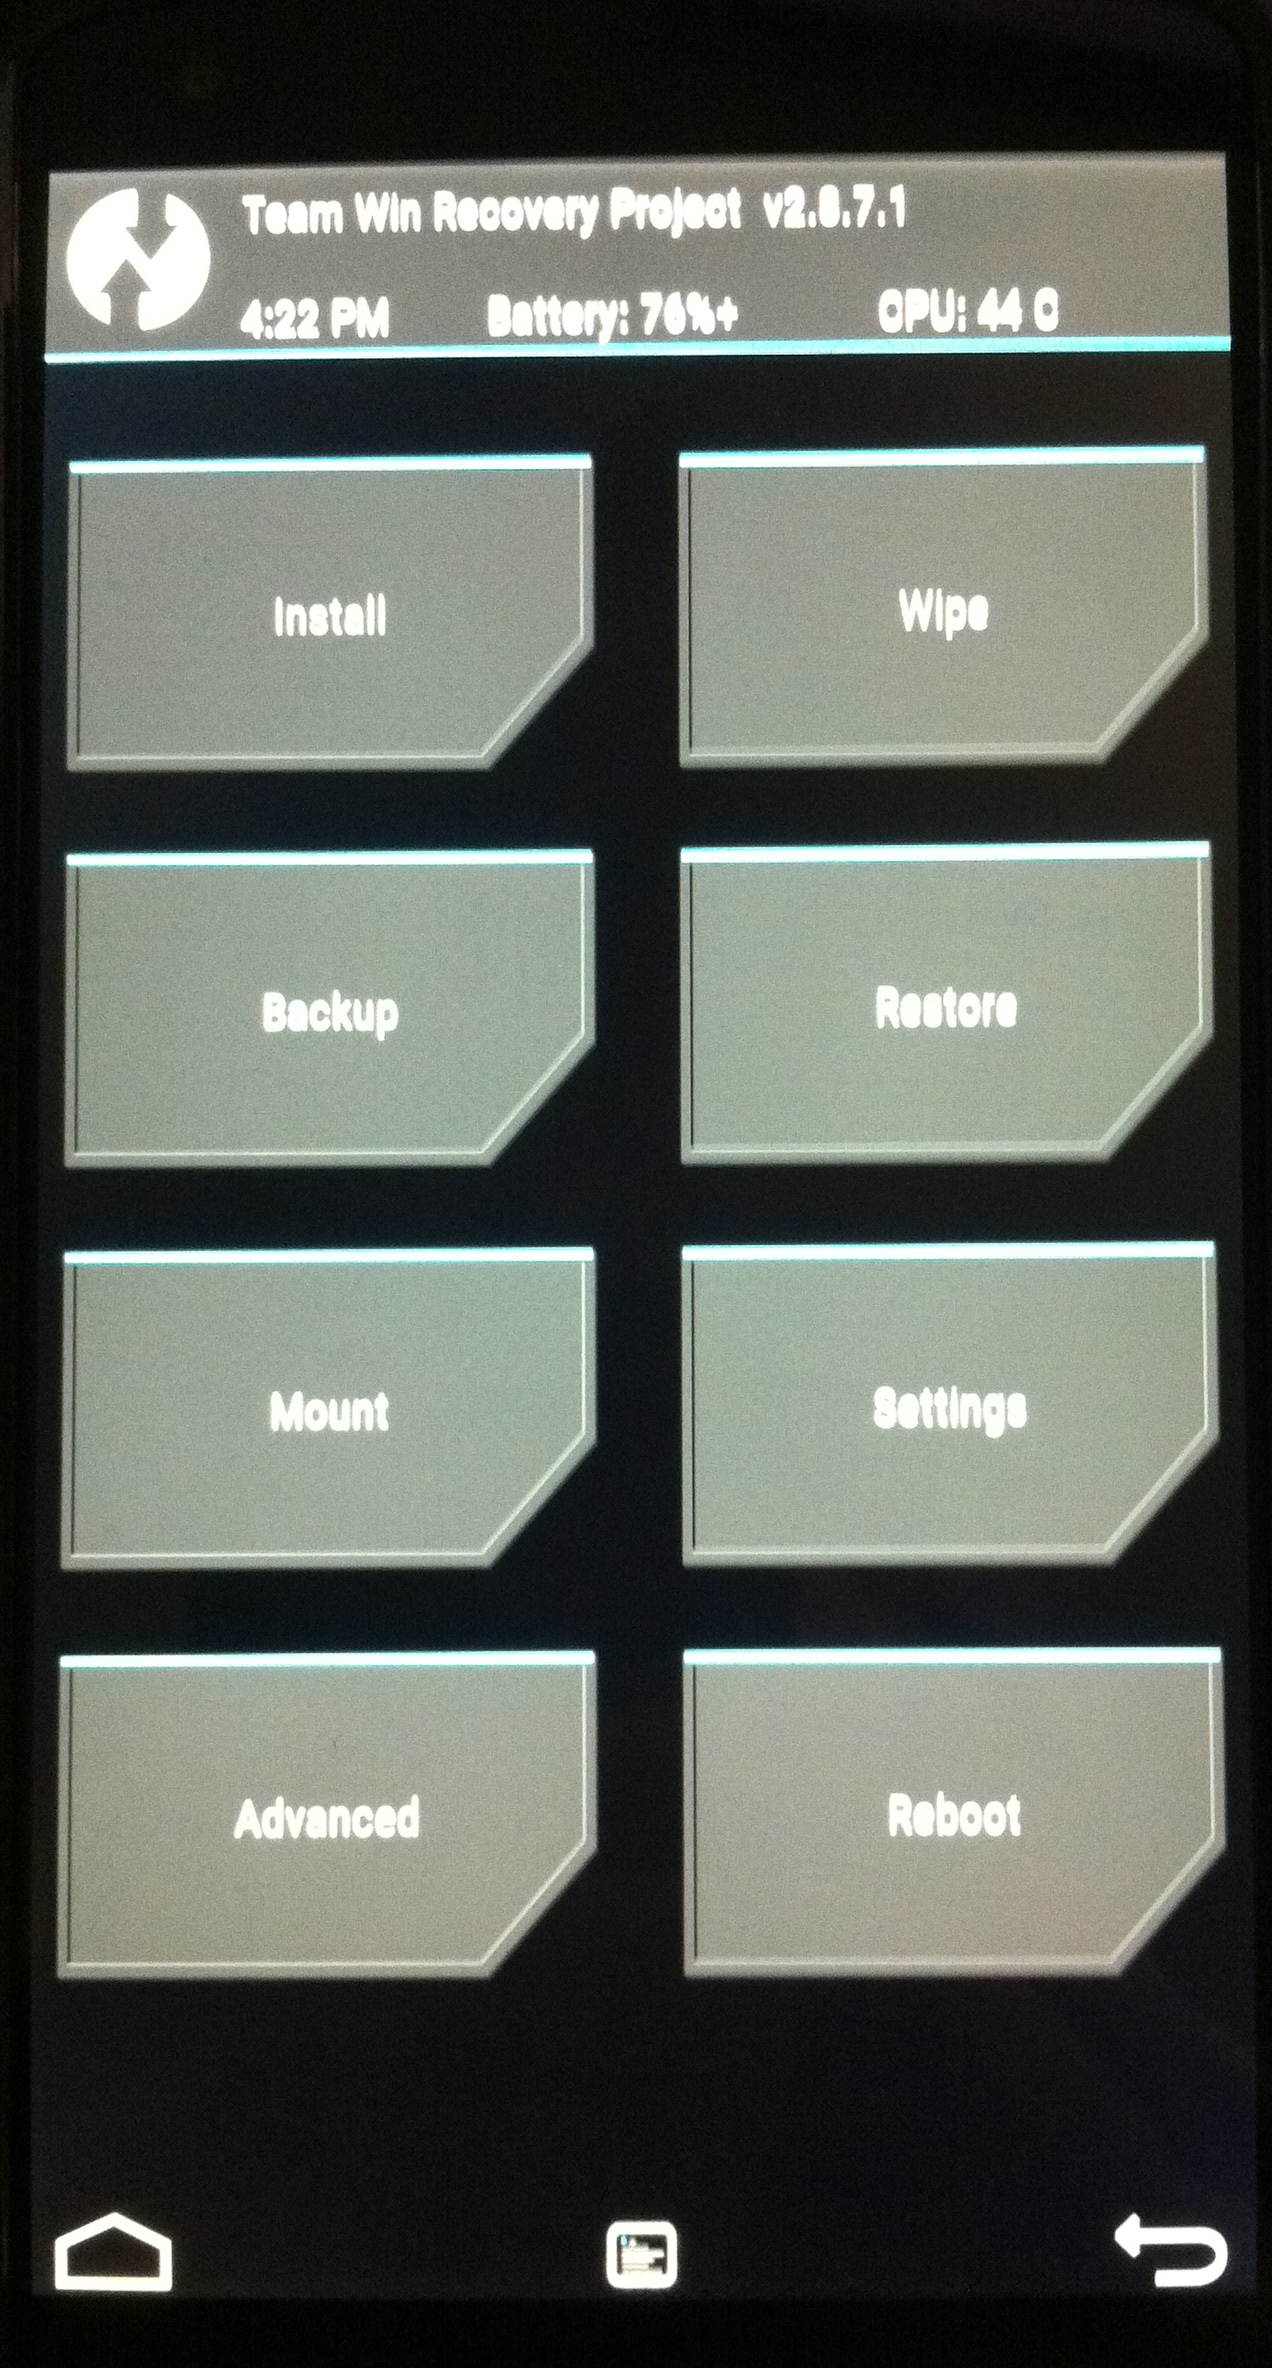
TWRP Interface
Further info: How to flash a recovery ROM.
Flash Cyanogenmod, Gapps (optional), and Xposed Framework
First, tap the “Wipe” button and swipe where it says “Swipe to Factory Reset”.
Go back to the main menu and tap the “Install” button
Navigate to the directory where you stored the Cyanogenmod .zip file and select it. Now tap “Add More Zips”, locate the Gapps .zip and select it. Tap “Add More Zips” again, locate and select Xposed Framework zip. You can flash all three in a row this way.
Check “zip signature verification”, which will verify that the files have been signed by the developers.
Finally, swipe where it says “Swipe to Confirm Flash” and all three zips will be flashed in sequence.
After successful completion, tap “Reboot”. Wait as Cyanogenmod configures the system and optimizes all applications.
Complete the initial setup.
Root the Phone
We need root access to the phone in order to install the Xposed Framework and XPrivacy application.
Go into Settings -> About Phone -> tap build number rapidly until the developer options become available.
Enable root temporarily. Settings -> Developer Options -> Root access -> Select “Apps only”. Note: ADB is for root access to the phone via USB and not required.
We also need to configure the phone to accept software installations from outside the official app store (Unknown sources).
Enable “Unknown sources” under Settings -> Security
Install Exposed Installer and XPrivacy
Open Cyanogenmod’s built-in File Manager app and locate the XposedInstaller .apk file. Select it to install.
Next, install the XPrivacy .apk file in the same way via the File Manager application.
After installation, go into the freshly installed Xposed Installer app and tap “Modules”. Check the XPrivacy module to enable it and then reboot the phone for the change to take effect.
XPrivacy should now be available in the main applications list.
Install and launch any app from the Playstore and watch as XPrivacy notifies you about all the resources that the app is requesting. Quite eye-opening indeed.
See this article for more information about APK files and how to install them.
Read the author’s official XPrivacy documentation
Tip: To see see system applications, select “Filter” from the menu and check “Filter on system applications”
Disable ROOT
To prevent other apps from gaining administrator privileges, disable root.
Settings -> Developer Options -> Root access -> Select “Disabled”.
Additional Resources:
- Cyanogenmod Installation WIKI
- Follow CyanogenMod on Google+ for security updates, news, etc.
- See the Xposed Reddit