In this post you will learn how to configure a Raspberry Pi as a wireless hotspot and captive portal for Android devices. Here is the objective:
When users connect to the Raspberry Pi with their phones, a notification will pop up asking them to sign into the network. When they tap the notification, a browser will open and take them to a page where they can download a group of files. We want all of this to happen without an Internet connection.
What is a captive portal? You’ve probably seen one after connecting to a public hotspot with your phone. The captive portal is the page that appears automatically and asks you to sign in or accept an agreement before you can use the Internet.
What causes the captive portal to open automatically? After your phone connects to the hotspot, it sends a request to a server on the Internet and waits for a response. If the response is a redirect, then the phone knows it’s trapped inside of a local network and displays a notification to sign in. When you tap that notification, you are taken to the captive portal.
This post will demonstrate how to setup a Raspberry Pi to send that redirect response to Android devices and open a fully functional browser relatively automatically so that users can download the files.
For this project, we will use Linux and the hardware that comes with the CanaKit Raspberry Pi 2 kit.
Contents
- 1 Choose Wireless Adapter
- 2 Install Raspbian OS
- 3 Install Updates and Services
- 4 Set Static IP Address
- 5 Edit Hosts File
- 6 Configure Hostapd
- 7 Configure Dnsmasq
- 8 Create Site Files
- 9 Configure Nginx
- 10 Build Download Page
- 11 Configure SSL
- 12 Open Browser From Captive Portal
- 13 Backup SD Card
- 14 Troubleshooting
- 15 Further Reading
- 16 References
Choose Wireless Adapter
You will need a wireless adapter to turn your Raspberry Pi into a hotspot. Before you buy one, check the adapter’s product description to make sure that it supports Access Point Mode. The adapter that comes with the CanaKit Raspberry Pi 2 kit will do the job:
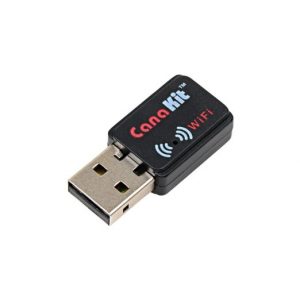
CanaKit ckxw1000 Wireless USB Dongle
Install Raspbian OS
Raspbian is the officially supported operating system for the Raspberry Pi. For this project, we don’t need all the features of the full Raspbian operating system. The latest copy of Raspbian Jessie Lite will do.
Insert the micro SD card into a USB reader and plug it into your computer. Open a terminal window and issue the fdisk command to locate the device name of the SD card:
sudo fdisk -l
The device name of the SD card will start with /dev/sdx, where the ‘x’ is probably ‘a’, ‘b’, or ‘c’ depending on how many storage devices you have attached to your computer. Find the device that matches the size of your SD card. Be careful here because writing to the wrong device can cause loss of data.
Once you have identified the SD card’s device name, you can copy the Raspbian image to it. Here is an example of a command that would copy a Raspbian image to the SD card located at /dev/sdc:
gzip -dc 2016-09-23-raspbian-jessie-lite.zip | sudo dd bs=4M of=/dev/sdc
We use the gzip utility to decompress the Raspbian OS image and then pipe the output into the dd command. This writes the image to the SD card located at /dev/sdc. The process will probably take a few minutes to complete.
When the command has finished, insert the SD card back into the Raspberry Pi. We will need an Internet connection initially to install updates and software packages, so connect the Ethernet port to a router with an Internet connection and then plug in the power cable to boot it.
Install Updates and Services
You can sign into the Pi with the default username (pi) and password (raspberry). If you’re concerned about unauthorized access, change the default password:
passwd
Although we’ve installed the latest version of Raspbian, there have probably already been many updates since the image was created. Let’s get the latest available updates and then upgrade the software:
sudo apt-get update && sudo apt-get upgrade
To turn the Raspberry Pi into a wireless access point and captive portal, we’ll need to install some additional software packages:
- hostapd: Allows the Pi to accept wireless connections from devices.
- dnsmasq: Provides DNS and DHCP services for small networks.
- nginx: A web server that will host the captive portal page.
Let’s go ahead and install them with the following command:
sudo apt-get install hostapd dnsmasq nginx
Of course, we want our captive portal page to have pretty buttons, so let’s use cURL to download the latest version of Bootstrap to our home directory.
curl -o ~/bootstrap.zip -L https://github.com/twbs/bootstrap/releases/download/v3.3.7/bootstrap-3.3.7-dist.zip
While we’re at it, let’s also grab the files that our users will be downloading. For this example, I’ll just download a Linux guide in PDF format.
curl -o ~/linuxbook.pdf http://tldp.org/LDP/intro-linux/intro-linux.pdf
We’ll move these files into the site’s html directory later.
Set Static IP Address
Since the Raspberry Pi will be the DHCP server on the wireless network, we need to assign a static IP address to its wireless adapter.
Open the interfaces configuration file:
sudo nano /etc/network/interfaces
Enter this configuration:
source-directory /etc/network/interfaces.d

auto lo
iface lo inet loopback

iface eth0 inet manual

# Start the interface when a "hotplug" event is detected
allow-hotplug wlan0

# Start the wlan0 interface at boot
auto wlan0
# Assign it a static IP address
iface wlan0 inet static
address 192.168.1.1
netmask 255.255.255.0
Save the file and restart the networking service:
sudo service networking restart
Verify that the wireless adapter has the IP address we assigned it by issuing the ifconfig command:
ifconfig
wlan0 Link encap:Ethernet HWaddr 00:0f:60:15:33:22
inet addr:192.168.1.1 Bcast:192.168.1.255 Mask:255.255.255.0
UP BROADCAST MULTICAST MTU:1500 Metric:1
RX packets:0 errors:0 dropped:0 overruns:0 frame:0
TX packets:0 errors:0 dropped:0 overruns:0 carrier:0
collisions:0 txqueuelen:1000
RX bytes:0 (0.0 B) TX bytes:0 (0.0 B)
Edit Hosts File
We want our users to see a friendly host name in our captive portal, not a cryptic IP address. We use the hosts files to map local host names to IP addresses. Let’s open it up for editing:
sudo nano /etc/hosts
The Pi’s host name can be whatever you want it to be. In this example, I’m calling it “download.localnet”.
Map the Raspberry Pi’s host name (download.localnet) to its IP address (192.168.1.1) by adding the following line to the bottom of the file:
192.168.1.1 download.localnet
Configure Hostapd
Hostapd is software that allows the Raspberry Pi to accept wireless connections from clients. We need to build its configuration file for our network.
sudo nano /etc/hostapd/hostapd.conf
Below is an example of what the configuration should look like. Customize these settings for your own network:
interface=wlan0
ssid=RasbPiWifi
hw_mode=g
channel=6
auth_algs=1
wmm_enabled=0
- interface – Wireless interface to listen for connections on
- ssid – Name of the access point that will appear in your phone’s list of Wi-Fi networks
- hw_mode – Wireless band to use. ‘g’ uses 2.4Ghz
- channel – Channel of operation. You may need to change this to avoid interference with other nearby networks. Choose 1, 6, or 11.
- auth_algs – Set to ‘1’ to use WPA authentication
- wmm_enabled – Set to ‘0’ to disable Wi-Fi Multimedia
Depending on your wireless adapter, you may also need to set the driver parameter here as well.
Now we need to tell the system where to find hostapd’s configuration file.
sudo nano /etc/default/hostapd
Uncomment this line:
#DAEMON_CONF=""
And make it look like this:
DAEMON_CONF="/etc/hostapd/hostapd.conf"
Restart the hostapd service so that the new settings are applied:
sudo service hostapd restart
You should now see the Raspberry Pi’s SSID in the list of networks on your phone:
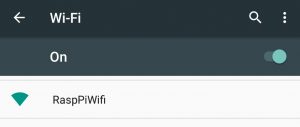
You can connect, but it will remain stuck at “Obtaining IP Address”. This is because we haven’t yet configured dnsmasq, the service that uses DHCP to assign IP addresses to devices. That’s the next step.
Configure Dnsmasq
Dnsmasq is software that assigns IP addresses to devices when they connect to the network (DHCP) and resolves host names to IP addresses (DNS).
Its default configuration file is rather large. You can read through it to get a better idea of what each parameter does. For now, let’s turn it into a backup copy:
sudo mv /etc/dnsmasq.conf /etc/dnsmasqBAK.conf
And open up a new one:
sudo nano /etc/dnsmasq.conf
Copy the following into it:
# Never forward addresses in the non-routed address spaces.
bogus-priv
# Add other name servers here, with domain specs if they are for non-public domains.
server=/localnet/192.168.1.1
# Add local-only domains here, queries in these domains are answered from /etc/hosts or DHCP only.
local=/localnet/
# Make all host names resolve to the Raspberry Pi's IP address
address=/#/192.168.1.1
# Specify the interface that will listen for DHCP and DNS requests
interface=wlan0
# Set the domain for dnsmasq
domain=localnet
# Specify the range of IP addresses the DHCP server will lease out to devices, and the duration of the lease
dhcp-range=192.168.1.10,192.168.1.254,1h
# Specify the default route
dhcp-option=3,192.168.1.1
# Specify the DNS server address
dhcp-option=6,192.168.1.1
# Set the DHCP server to authoritative mode.
dhcp-authoritative
When a phone is connected to our hotspot, we want all of its DNS requests to resolve to the IP address of the Raspberry Pi. For example, if a user opens their browser and goes to google.com, we want the request for google.com to resolve to the Pi’s IP address (192.168.1.1). This way they will see our download page instead of an error message. We accomplish that with this configuration line:
# Make all host names resolve to the Raspberry Pi's IP address
address=/#/192.168.1.
We also have to specify the range of IP addresses the Raspberry Pi will assign to devices that connect to the network. Here we tell dnsmasq to assign 192.168.1.10 through 192.168.1.254 with a lease time of one hour. You can adjust these values based on the number of connections you are expecting.
# Specify the range of IP addresses the DHCP server will lease out to devices, and the duration of the lease
dhcp-range=192.168.1.10,192.168.1.254,1h
Restart the dnsmasq service for the changes to take effect:
sudo service dnsmasq restart
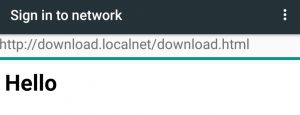
Reconnect to the hotspot and you should receive an IP address this time. If you open your browser and try to go to any website, you should see a page like this:
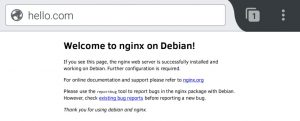
If instead you see the actual website, your phone has probably detected that there’s no Internet through the Raspberry Pi and has switched over to use your data connection (4G, LTE, etc.) instead. Disable cellular networks in your phone’s settings and try again.
In the example above, dnsmasq has received a DNS request for the domain hello.com and resolved it to the IP address of the Raspberry Pi (192.168.1.1). Nginx is listening for HTTP connections, so it returns the default page to your web browser.
In the next section, we’ll replace the default nginx page with our own.
Create Site Files
Let’s create the directory that will contain our captive portal page:
sudo mkdir /usr/share/nginx/html/download --mode=u+rwx,g+srw,o-w
The mode option sets the permissions of the directory. The setgid bit (g+s) makes it so that any new files created within the directory will inherit the directory’s group owner.
Nginx uses the group www-data, so let’s set the owner of all files within the html directory to pi and the group owner www-data:
sudo chown pi:www-data -R /usr/share/nginx/html
We’ll create a very simple web page for now:
echo "<h1>Hello</h1>" > /usr/share/nginx/html/download/download.html
In the next section, we’ll configure nginx to redirect users to download.html when they connect to our hotspot.
Configure Nginx
Nginx can host multiple sites, and each one requires its own configuration file. The configuration file tells nginx where the files for the site are located and how to handle client requests. Let’s create a new configuration file for our site:
sudo nano /etc/nginx/sites-available/mysite.conf
Copy and paste the following into it:
server {
        # Listen for requests over both HTTP and HTTPS
        listen 80;
        listen [::]:80;
        #listen 443 ssl;
        #listen [::]:443;
        # Present a friendly name to the client, instead of an IP address
        server_name download.localnet;
        #Include HTTPS configuration from the snippets directory
        #include snippets/self-signed.conf;
        #include snippets/ssl-params.conf;

        root /usr/share/nginx/html/download;

        index download.html index.html index.htm index.nginx-debian.html;

        # Redirect requests for /generate_204 to open the captive portal screen
        location /generate_204 {
                return 302 http://download.localnet/download.html;
        }

        # Redirect requests for files that don't exist to the download page
        location / {
                try_files $uri $uri/ /download.html;
        }
}
Note the statement location /generate_204 on line 18. When an Android phone connects to our hotspot it will send a request to http://connectivitycheck.android.com/generate_204 to test if it has a connection to the Internet. If it receives a redirect response, then a notification will appear on the phone asking the user to sign in via the captive portal.
Dnsmasq resolves connectivitycheck.android.com to the IP address of our Raspberry Pi and nginx receives the phone’s request for generate_204. We have configured nginx to return code 302 (redirect) when a request for generate_204 comes in. This will cause the phone to display a notification to sign into the network.
Activate the new site by creating a link to it in the sites-enabled directory:
sudo ln -s /etc/nginx/sites-available/mysite.conf /etc/nginx/sites-enabled/mysite.conf
Deactivate the default nginx site to prevent conflicts:
sudo rm /etc/nginx/sites-enabled/default
Restart the server for the changes to take effect:
sudo service nginx restart
If you reconnect to the hotspot, you should receive a notification to sign in:
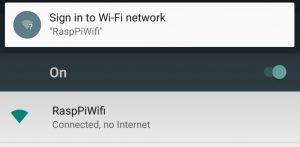
When you tap the notification, it should take you to the captive portal and display our custom page:
Build Download Page
Let’s improve upon our simple download page by adding some pretty buttons to it.
Copy the Bootstrap file (we downloaded earlier) from your home directory to the site’s root html directory:
cp ~/bootstrap.zip /usr/share/nginx/html/download
Unpack it using the unzip command:
unzip /usr/share/nginx/html/download/bootstrap.zip -d /usr/share/nginx/html/download/
We also need to copy in the files that our users will be downloading. In this example, we’re only providing the one we downloaded earlier:
cp ~/linuxbook.pdf /usr/share/nginx/html/download
Let’s open the download page and add more code to it:
sudo nano /usr/share/nginx/html/download/download.html
Replace what’s in there with the following:
<!DOCTYPE html>
<html lang="en">
    <head>
        <meta charset="utf-8">
        <meta name="viewport" content="width=device-width, initial-scale=1">
        <link rel="stylesheet" href="bootstrap-3.3.7-dist/css/bootstrap.min.css">
    </head>
<body>

<h1>Files for Download</h1>

<!-- Chrome on Android won't download files from a site with a self-signed certificate, so we must specify HTTP in the download URL -->
<a href="http://download.localnet/linuxbook.pdf" class="btn-lg btn-primary" style="display: block;">Linux Book</a><br>
<a href="http://download.localnet/doc2.pdf" class="btn-lg btn-primary" style="display: block;">Document 2</a><br>
<a href="http://download.localnet/doc3.pdf" class="btn-lg btn-primary" style="display: block;">Document 3</a><br>

</body>
</html>
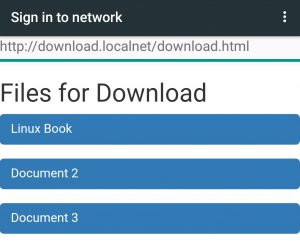
Reconnect to the hotspot. When you tap the notification to sign in you should see a much nicer looking download page:
That looks perfect. But if you tap the button for the Linux Book, nothing will happen. This is because Android’s captive portal does not support file downloads. Egads!
You have to manually open a web browser and type in a web address. The download page will open and you can tap the button to start downloading the file.
The remainder of this post will focus on how we can get the default browser (Like Chrome or Firefox) to open automatically and display the download page.
So far, the only way I’ve found to launch a web browser from the captive portal is to force an SSL connection. That way the user is presented with a security warning that gives them the option to continue with a browser.
If you know of a simpler way to open a web browser from the captive portal, please let me know if the comments section at the bottom of the page!
If you’re interested, let’s continue and setup SSL for nginx.
Configure SSL
SSL (Secure Sockets Layer) is used for establishing an encrypted link between a web server and a browser. An SSL connection appears as HTTPS:// in the browser instead of HTTP://. To enable SSL on the Raspberry Pi we need to generate a self-signed certificate, key pair, and make some configuration changes to nginx.
Generate Key and Certificate
The following command will generate a key and place it in the /etc/ssl/private/ directory. It will also generate a certificate and place it in the /etc/ssl/certs/ directory.
sudo openssl req -x509 -nodes -days 365 -newkey rsa:2048 -keyout /etc/ssl/private/nginx-selfsigned.key -out /etc/ssl/certs/nginx-selfsigned.crt
You’ll be asked to provide some information that will be embedded into the certificate. Most fields can be left blank. Enter the full domain name of the Raspberry Pi as the Common Name.
Country Name (2 letter code) [AU]:
State or Province Name (full name) [Some-State]:
Locality Name (eg, city) []:
Organization Name (eg, company) [Internet Widgits Pty Ltd]:
Organizational Unit Name (eg, section) []:
Common Name (e.g. server FQDN or YOUR name) []:download.localnet
Email Address []:
Reconfigure Nginx
Let’s create a couple snippets for handling SSL connections. A snippet is a small section of the main configuration file that’s kept in a separate file.
The first snippet will be called self-signed.conf:
sudo nano /etc/nginx/snippets/self-signed.conf
Add two directives to tell nginx where the certificate and key are located:
ssl_certificate /etc/ssl/certs/nginx-selfsigned.crt;
ssl_certificate_key /etc/ssl/private/nginx-selfsigned.key;
The second snippet will be called ssl-params.conf:
sudo nano /etc/nginx/snippets/ssl-params.conf
Copy and paste the SSL parameters from here. No customization is necessary.
# from https://cipherli.st/
# and https://raymii.org/s/tutorials/Strong_SSL_Security_On_nginx.html

ssl_protocols TLSv1 TLSv1.1 TLSv1.2;
ssl_prefer_server_ciphers on;
ssl_ciphers "EECDH+AESGCM:EDH+AESGCM:AES256+EECDH:AES256+EDH";
ssl_ecdh_curve secp384r1;
ssl_session_cache shared:SSL:10m;
ssl_session_tickets off;
ssl_stapling on;
ssl_stapling_verify on;
resolver 8.8.8.8 8.8.4.4 valid=300s;
resolver_timeout 5s;
# Disable preloading HSTS for now.  You can use the commented out header line that includes
# the "preload" directive if you understand the implications.
#add_header Strict-Transport-Security "max-age=63072000; includeSubdomains; preload";
add_header Strict-Transport-Security "max-age=63072000; includeSubdomains";
add_header X-Frame-Options DENY;
add_header X-Content-Type-Options nosniff;
We need to uncomment the references to SSL in the site’s main configuration file:
sudo nano /etc/nginx/sites-available/mysite.conf
Remove the ‘#’ in front of these lines:
        listen 443 ssl;
        listen [::]:443;

        include snippets/self-signed.conf;
        include snippets/ssl-params.conf;
And change the redirect statement to use HTTPS instead of HTTP:
return 302 https://download.localnet/download.html;
Restart nginx to apply the changes:
sudo service nginx restart
Open Browser From Captive Portal
Reconnect to the hotspot. The captive portal should show you a warning message with an option to open a browser:
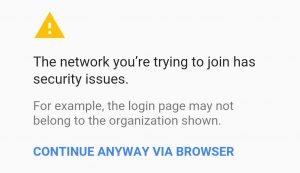
Tap the link to continue anyway and the default browser will open. You will have to accept the browser’s security warning that the site is not secure.
The download page should appear and the top download button should work now. Not perfect, but it works!
Backup SD Card
Let’s backup our work. Save the Raspberry Pi’s SD card as an image on your hard drive.
Shutdown the Raspberry Pi gracefully:
sudo shutdown -h now
Eject the SD card from the Raspberry Pi, insert it into your USB reader, and plug it into your computer. Locate its device name and then issue the following command to copy it to your computer in compressed format (replacing the X’s with today’s date):
sudo dd bs=4M if=/dev/sdc | gzip > XXXX-XX-XX-raspbian-jessie-lite.gz
Troubleshooting
Check the logs if you’re having any trouble. They often provide clues as to what the problem is. Use the tail command to show only the most recent log entries.
The syslog can help identify issues with hostapd and dnsmasq:
tail -n15 /var/log/syslog
The nginx error log will show problems related to site configuration:
tail -n15 /var/log/nginx/error.log
The nginx access log will show HTTP requests and responses:
tail -n15 /var/log/nginx/access.log
Further Reading
If you’re a fan of the Raspberry Pi, check out my other post about how to turn one into an open-source gaming console.
References
This blog post wouldn’t have been possible without the information found on many other websites:
http://sirlagz.net/2013/08/23/how-to-captive-portal-on-the-raspberry-pi/
https://frillip.com/using-your-raspberry-pi-3-as-a-wifi-access-point-with-hostapd/
http://stackoverflow.com/questions/3615147/how-to-create-wifi-popup-login-page
http://stackoverflow.com/questions/12924896/rewrite-all-requests-to-index-php-with-nginx
https://code.google.com/p/android/issues/detail?id=3492
https://www.raspberrypi.org/forums/viewtopic.php?f=91&t=46911
I am trying to create a kind of Wifi Hotspot and this this guide is extremely helpful!! I have been searching everywhere for this and you covered 90% of my questions. One thing though, would it be possible to let all https requests be allowed to passthrough from wlan0 to my eth0 connection but rediect http requests to my local server?
That way when they eventually click an http link they will get my page but there won’t be any warnings about it being unsecure when they request https sites.
Would I use some kind of iptables rule or maybe somehow bridge wlan0 and eth0 in a certain way.
Hi,
the steps worked fine.. but why am I not able to use connect to internet using lan or dongle after the steps?
I am wondering how to make a samsung phone pop-up using that same procedure. It worked on both IOS and android, but for some reason I couldn’t get the pop-up on any of the samsung phones! Could you help me identify it?
Hi, Did you find a solution to make it working with samsung devices?
Nope, the Samsung Phones and the Mi phones didn’t work, so we took an alternative method(openwrt-Captive Portal)
Hello Ram, did you succeed to auto display captive portal or popup signin wifi for samsung and Mi phones using this alternative?
Great Tutorial! I can now see the captive portal. But i don’t have internet access after that, it only pop up the captive portal, also i can’t show an image from internet on it.
Does this tutorial has a second part?
How can we enable the internet access? I mean i don’t have internet on my raspberry connected by ethernet anymore.
Ho can i put a button to connect to internet after push it on my mobile?
Thanks for your Great Tutorial.
is it possible to use Apache instead of nginx.
Your guide is great, and has helped me a lot, abre:
I would like the client after logging in on the wlan sees the start page and then connected by clicking on a field directly with a deposited homepage online. Is this possible?
Can this work Debian 9 Linux on a Raspberry PI3 ?
Haaaay! It works but my internet is gone. That defeats the purpose.
Fantastic.
I have created a free wifi with a website that shows amazon affiliates.
The users when they see the wifi open they connect and I get money from the things they buy on Amazon, it’s great.
Thank you very much.
Great tutorial, thanks 🙂
hi guys, any news about how to fix auto display captive portal or popup notification on samsung phones?
Pingback: How to build a captive web portal with any router and a Raspberry Pi – Technical wanderings
You made my day. <3
Hi ,
Can I use same procedure for bluetooth Interface